


![]() I recently got myself set up to watch and record high-definition TV (HDTV) using Windows Media Center on a nettop PC connected to a Silicon Dust HDhomerun digital cable card TV tuner. Up til now, I'd been using a Panasonic DVD-RW/VHS player with an 80GB hard disk, which could record low-def TV.
I recently got myself set up to watch and record high-definition TV (HDTV) using Windows Media Center on a nettop PC connected to a Silicon Dust HDhomerun digital cable card TV tuner. Up til now, I'd been using a Panasonic DVD-RW/VHS player with an 80GB hard disk, which could record low-def TV.
This old thing had an infrared transmitter that would change the channel on my cable box when it was time to record something. Half the time, it failed to change to the correct channel. Before cable went all digital, it used to be able to get TV Guide listings over the analog cable signal, but that stopped working during the digital switch, so I had to schedule recordings manually. After I discovered that the DVD burner was shot, I had had enough. Time to modernize.
Now when you think about connecting your PC to your TV, the first thing you imagine is a full sized, loud Tower PC sitting on floor next to your TV. I agree, that's nothing that you would want. What you want is something very small and very quiet. Before I go on, let me disclose that the product links in this article are linked to Amazon's web site. That's where I bought everything for this setup, prices were good, delivery was prompt, and I didn't have any trouble with any of the parts. You might be able to save a buck or two hunting around elsewhere for parts, if you think it's worth the trouble.
The Ideal PC for your TV
OK, so what we want is a very small and quiet PC to sit near our TV. To make it quiet, we want something that doesn't generate a lot of heat, and therefore doesn't need a powerful cooling fan. This class of PC doesn't have a very powerful processor. There's a low-end tier of processors from AMD and Intel such as the AMD E-350 and the Intel Atom processors. The word on the street is that the Atom processors don't handle high-def video all that well, though I can't confirm that. However, the AMD E-350 has a powerful integrated graphics processor that handles HD just fine. The E-350 is a 1.6 GHz processor which sounds wimpy, and it is, but it works fine for HD video.
Amazon sells a bare-bones system with the E-350 in it. All we need to do is add some RAM and a hard disk, and we've got a complete PC. Here's the one that I bought:
Foxconn NTA350 AMD Radeon HD Mini/Booksize Barebone System (Black)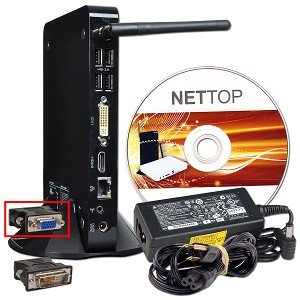
The current price as of this writing is $185. Next, we need some RAM. This PC has one laptop-style DIMM slot into which we can out a 4GB DIMM. You might be just fine with 2GB, but since RAM is cheap, I would go with 4GB. Here the link to the DIMM that I bought: Corsair 4GB (1x4GB) DDR3 1333 MHz (PC3 10666) Laptop Memory (CMSO4GX3M1A1333C9), current price, $19.
To complete the PC hardware purchase, we need a hard disk. Now, the PC has room for one 2.5" SATA drive. You could buy any drive that meets that criteria, though I would recommend you go fairly large, so that you'll be able to store as much recorded TV as possible. I don't think performance is all that much of an issue either, so you could get yourself a relatively cheap 5400 RPM 1TB disk. However, I've become a fan of better-performing drives, so I opted for the cost-effective but excellent performer: Seagate Momentus XT 750 GB 7200RPM SATA 6Gb/s 32 MB Cache 2.5 Inch Solid State Hybrid Drive ST750LX003, current price: $120. 750 GB gets you somewhere around 400+ hours of HD recording, by the way.
Network TV Tuner
Now we've got our PC hardware, we need to get our digital TV sibnal onto our PC. Now this PC doesn't have any slots for installing PCI cards, but then again, we don't need one. I decided to get the SiliconDust HDHR3-CC HDHomeRun PRIME CableCARD TV tuners
This device has a TV cable connection, a slot for a cable card, and a gigabit network port. I was able to get a cable card from Comcast for free (additional cards can be had for like $1.50 each). The device has three tuners, so you can watch or record three things at once. The cable card is required to decrypt the encrypted channels, which for Comcast, is almost every channel. Without the cable card, you can only get a handful of channels that are viewable on the raw cable. The cable card gives you all your channels, except for On-demand and PPV.
The tuner comes with an Ethernet cable which you should plug into your wireless router. You also need to connect the tuner to the TV cable, and plug the cable card into the slot provided. After it's all ready to go, follow the instructions to get the cable card information so you can call your cable company to get the card activated.
A Few Other Items
There's a few other things you'll probably need. First of all, you're not going to want to use a wired keyboard and mouse to operate the TV, of course you'll want to be able to use a handheld remote control, but some of the time you'll need a keyboard and mouse, so I got a long-range wireless keyboard and touch pad. Logitech makes this one: Logitech Wireless Touch Keyboard K400 with Built-In Multi-Touch Touchpad (920-003070), current cost: $32.00.
It will come in handy when you're installing and managing your operating system, scheduling recordings, etc. However, you'll also what to get a remote control. This one for $13.50 does the trick nicely: Windows 7 Vista XP Media Center MCE PC Remote Control and Infrared Receiver.
Oh and, annoyingly, the PC doesn't come with an HDMI cable, so you'll need one of those two. Here's the one I got: AmazonBasics High-Speed HDMI Cable (6.5 Feet/2.0 Meters) - Supports Ethernet, 3D, and Audio Return [Newest Standard]
Finally, you'll need a copy of Windows 7 or Windows 8 (an edition that includes Media Center) unless you plan to run an open source version of Linux. I am a Linux fan, but Windows Media Center is pretty sweet, so I decided to go that route.
The Setup
Assuming you bought everything above, the setup is fairly simple. To install the RAM and the hard drive into the PC, you remove four screws and pry off the PC's cover. Inside, you'll find the slot for the RAM, and a frame for the disk drive. Remove the screws holding in the drive frame, then mount the drive into the frame. Then you can (barely) put the frame back in and slide the drive onto the connector before screwing the frame back into the PC. Install the RAM, then screw down the cover.
Once the PC is assembled, either plug it into your TV using the HDMI cable, or plug it into your PC monitor using the VGA adapter provided. Plug in the wireless USB Keyboard dongle, and power up the PC. To get Windows installed, you've got two options: either plug in a USB DVD drive, or get your Windows DVD copied onto a USB stick. To do this, download the Windows 7 USB/DVD Download Tool.
Next, you need to install the HDhomerun software. The software and instructions can be located here: http://www.silicondust.com/support/.
In part two, I'll go into the HDhomerun and Windows Media Center setup in detail. In the mean time, good luck with your setup. I'm now enjoying recording HDTV and pausing and rewinding live TV! It's heaven!
How to Watch and Record HDTV on Your PC - Part 1
 1:37 PM
 Brian Seltzer


 Image icons used on this site are courtesy of Oxygen-icons.org
0 comments:
Post a Comment